Invoices | Payment Processing | Refunds
When a winning bidder fails or is unable to complete a purchase, the invoice should be marked either as a “No Show" or as a “No Sale" depending on the circumstances.
NO SHOW
No Show means the bidder fails to honor a valid winning bid. When the reason for an unpaid invoice is the fault of the bidder, the invoice should be processed as a “No Show." Bidders may lose their bidding privileges for “No Show" invoices.
Common “No Show" reasons from the bidder:
-
Failed to show up on removal day or the agreed-upon alternate removal day.
-
Refused to take possession of the asset at the removal. Important: The lot description and picture must accurately reflect the asset to be considered a “No Show."
-
Didn’t realize the auction location or decided a low-value item was not worth picking up.
-
Claims he didn’t place a bid.
-
Decides shipping is too expensive/didn’t realize shipping wasn’t available on the asset.
-
A canceled check, disputed credit card transaction or credit card has been declined.
NO SALE
No Sale means the purchase cannot be completed due to an issue with the asset. The asset, as described, is unavailable to the winning bidder at the removal. No Sale invoices should be infrequent. “No Sale" invoices typically indicate the affiliate has an issue they need to address to prevent future “No Sale" invoices (the exception being assets damaged after the invoices were generated).
When processing an invoice as a “No Sale," the affiliate needs to indicate the reason.
Common “No Sale" reasons (and guidance for avoiding that type of “No Sale" in the future):
-
Damaged Assets – the only time an asset will be a "No Sale" due to damage is if the asset sustained damage after the auction closes. If an asset is discovered to be damaged during the course of the auction, the affiliate needs to contact Equip-Bid immediately and request to have the item halted.
-
Misrepresented – the description/picture of a lot doesn’t represent the asset accurately. Either the seller or the affiliate failed to fully disclose material facts about the asset. Affiliates are ultimately responsible for the accuracy of lot descriptions and pictures. Mistakes will happen, but if the misrepresentation is a regular occurrence, the affiliate obviously needs to make the full disclosure clause in their consignment agreement much more prominent, and consider charging the seller a fee for every asset that fails to sell because it was inaccurately described.
-
Reserve Lowered – The reserve was lowered after the winning bidder placed their bid. If this is a regular occurrence, the reserves are clearly being set above the “absolutely can’t sell for less” amount. Affiliates need to spend time educating their sellers on the risks associated with reserves. Sellers need to understand that if their reserve is set too high and it is lowered after the last bid is placed, the winning bidder is in control of whether the asset sells or not. There is no penalty for bidders who become winning bidders by default.
-
Missing/Stolen - The asset was either given to the wrong winning bidder or the asset 'disappeared' before the winning bidder picked up and paid for the item.
-
Other – the only time an affiliate should process an invoice as “No Sale" - Other is when something unusual occurs such as:
-
Theft – affiliate needs to identify/resolve the weaknesses in their security system.
-
Seller fails to honor contract – refuses to sell for high bid price (contact Equip-Bid ASAP) – Seller will be prohibited from selling on Equip-Bid.com in the future.
-
Affiliate error at removal resulting in the wrong bidder taking an asset - Develop a system to double-check assets against the invoice.
-
No-Show Bidders
No-show bidders are, unfortunately, a cost of doing business for an online auction company. Equip-Bid is committed to doing everything possible to minimize the impact no-show bidders have on the auctions published on equip-bid.com. The fraud-detection and protection element of our auction software is key to stopping ‘problem’ bidders from re-registering and red-flagging bidders who are exhibiting unusual bidding behavior.
A no-show bidder is a bidder who failed to honor his winning bids and/or the terms of an auction when he was identified as the winning bidder.
The bidder bears 100% responsibility for the invoiced assets not selling.
Affiliates play a critical role in controlling the damage no-show bidders cause on website. We know from experience, a no-show bidder on one auction is likely to be a no-show bidder on other auctions which is the reason Equip-Bid is so adamant about timely invoice processing. The sooner a no-show bidder is identified, the sooner his bidding privileges can be disabled—hopefully before the bidder has a chance to damage the results of another affiliate’s auction.
While no-shows are always disappointing, it is important to recognize even good bidders are known to not show on occasion. Generally, when high-quality bidders are made aware of their error, they do whatever they can to remedy the situation, often contacting the affiliate to check on the possibility of a late removal. The ideal outcome is the affiliate is able to accommodate the request for a late removal (don’t forget to reprocess the invoice as PAID and contact Affiliate Services to reinstate bidding privileges if necessary). However, if a late removal is not possible, the affiliate should direct the bidder to contact Equip-Bid via support@equip-bid.com.

The Process for Disabling No-Show Bidders
Bidders with a no-show invoice with high bids over $25.00 lose their bidding privileges immediately upon the affiliate processing their invoice as a no-show.
Bidders with no-show invoices below $25.00 do not lose their bidding privileges but are subject to review. A bidder with multiple low-value invoices processed as a “no-show" will lose their bidding privileges.
Bidder Penalty Fees
The website terms state:
If a winning bidder fails to complete the purchase within the time allotted, Equip-Bid may consider the bid abandoned. In such cases, Equip-Bid may charge a fee of 20% of Buyer’s final purchase price. By agreeing to these terms and conditions, you specifically authorize Equip-Bid to charge this fee to the credit card on file.
No Pay / No Show Process
1st Time
-
Under $100 invoice - $20 fee
-
Over $100 invoice - $35 fee + 20% of the unpaid invoice amount.
2nd Time
-
Under $100 invoice - $35 fee to be turned on again with a final warning.
-
Over $100 invoice - $35 + 20% of the unpaid invoice amount with a final warning
3rd Time
- Blocked - Your third incident will result in a permanent block from the Equip-Bid site.
Any bidder caught opening a new account
- Will be charged an additional $50 with the above warnings. This is considered fraudulent bidding and is not tolerated.
Mark as No-Sale
If you determine that an invoice needs to be canceled, this MUST be marked as a NO-SALE. This will not penalize the bidder but is required for correct accounting.
For example, a no-sale invoice may be one that you discover an item was missing or not disclosed as damaged before the bidder pays.
Refund Best Practices
The word refund in the auction world is usually an unknown, rarely used term. It is usually replaced with terms like “as is, where-is" or “no warranty, expressed or implied." That being said, good business practices need to follow the line with good service, and there are times when it may be appropriate for a refund.
Such times may be:
-
Item damaged after listing
-
Item destroyed
-
Items that are grossly misrepresented
-
Item missing
Times when it probably isn't appropriate:
-
Buyers remorse
-
Buyer changes their mind
-
Buyers chooses not to pick up the item for a long period of time
Always have a paper trail. It's best to never issue a cash-back; cut a check if needed.
This is your business, but it can affect others. Quality, accurate pictures and descriptions are a must and the key to fewer refunds and fewer chargebacks. If you know there is an issue, tell them! Do NOT let it slide; that goes against your credibility and integrity. The short term “win" will give you a long term “loss."
You may be eligible to receive a refund from Equip-Bid on your refunded Buyer's Premium. Find more information HERE.
To get a step by step tutorial on issuing a Paytrace refund, click HERE.
Best Practices for Accepting Checks
If you choose to accept personal or cashier's checks as payment from winning bidders, you should take the time to establish a detailed check acceptance policy to help identify and avoid bad checks, and make sure everyone on your team is aware of the policy.
Common check policies include:
-
Checks must be from a local or in-state bank.
-
Checks must be for no more than the purchase amount.
-
Do not accept starter checks, unnumbered checks, or non-personalized checks.
-
Never accept a third-party check (a check made payable to someone other than yourself that has been “signed over” to you).
-
Collect additional contact information - a second phone number, or two phone numbers if no number is printed on the check.
-
Ask for identification, and compare it to the information on the check.
-
If the winning bidder sends someone else to your removal with a pre-filled check, collect the pickup person's ID and contact information.
-
Carefully examine every personal check for information that is essential for cashing the check:
-
Personalization - The customer's complete name and address must appear on the check.
-
Date - The check date must be current. Do not accept post- or future-dated checks.
-
Bank I.D. numbers - The check must have a bank identification number, or routing transit number, that runs across the bottom, along with the customer's account number and check number.
-
Dollar amounts - Both the written and numeric amounts must match.
-
Customer Signature - The check should be signed in your presence and verified with photo identification.
Security Standards
No examination is foolproof and counterfeiters are becoming ever savvier, but here are some common features to look for to help tell a real check from a counterfeit:
-
Checks must be from a local or in-state bank.
-
Genuine checks almost always include a list of security features on the back (watermarks, microprinting, color change, heat-sensitive) that you can verify.
-
Look for a perforated edge. With the exception of government checks, every check has at least one perforated edge.
-
Real checks use microprinting on the signature line. If you can't detect this with your naked eye, consider adding a magnifying glass to your checkout kit.
-
Routing and account numbers should be CRISP, not blurry/bleeding into the paper, and DULL. Ordinary laser printer toner is shiny; the special magnetic ink required for the automated check sorting equipment banks use has a dull finish.
-
Look for the name of the check printing company on the left border of the check.
-
The first few digits of the routing number printed at the bottom of the check can also be found in smaller print at the top of the check.
-
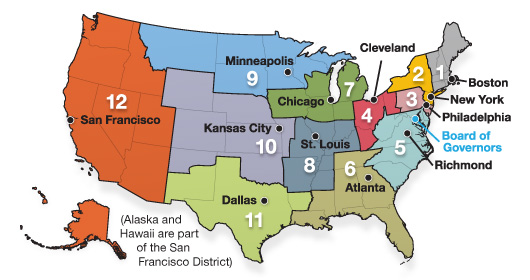
A check's routing number always begins with the Federal Reserve District number for the branch where the account is held (note that some banks use a +20 routing number – so checks from the Minneapolis district could have a routing number starting with 09 or 29). Counterfeiters will often use the wrong Federal Reserve District number to delay the discovery of the forgery. Depending on your location, you may want to familiarize yourself with the Federal Reserve District numbers for the neighboring region(s) as well as your own.
Be aware of what Federal Reserve District you are in. There are twelve different districts as shown in the picture.
When In Doubt
-
If you think a check, particularly a cashier's check, might be a fake, call the issuing bank (look up the bank's phone number online, don't rely on the number printed on the check!) and ask to verify funds. Some banks may not disclose whether funds are available (citing privacy issues), but they should at least confirm that the account number exists - or that they issued the check, in the case of a cashier's check.
-
Wait 10-14 days after depositing a check before spending or moving the funds, to allow the check to fully clear.
-
This goes for cashier's checks, too! Even though the funds are guaranteed for a legitimate cashier's check, a counterfeit may not be detected until it reaches the Federal Reserve.
-
Or, instead of depositing the check into your bank account, take it to a branch of the issuing bank and have it cashed.
Credit Card Refunds
How to Issue a Credit Card Refund on Paytrace
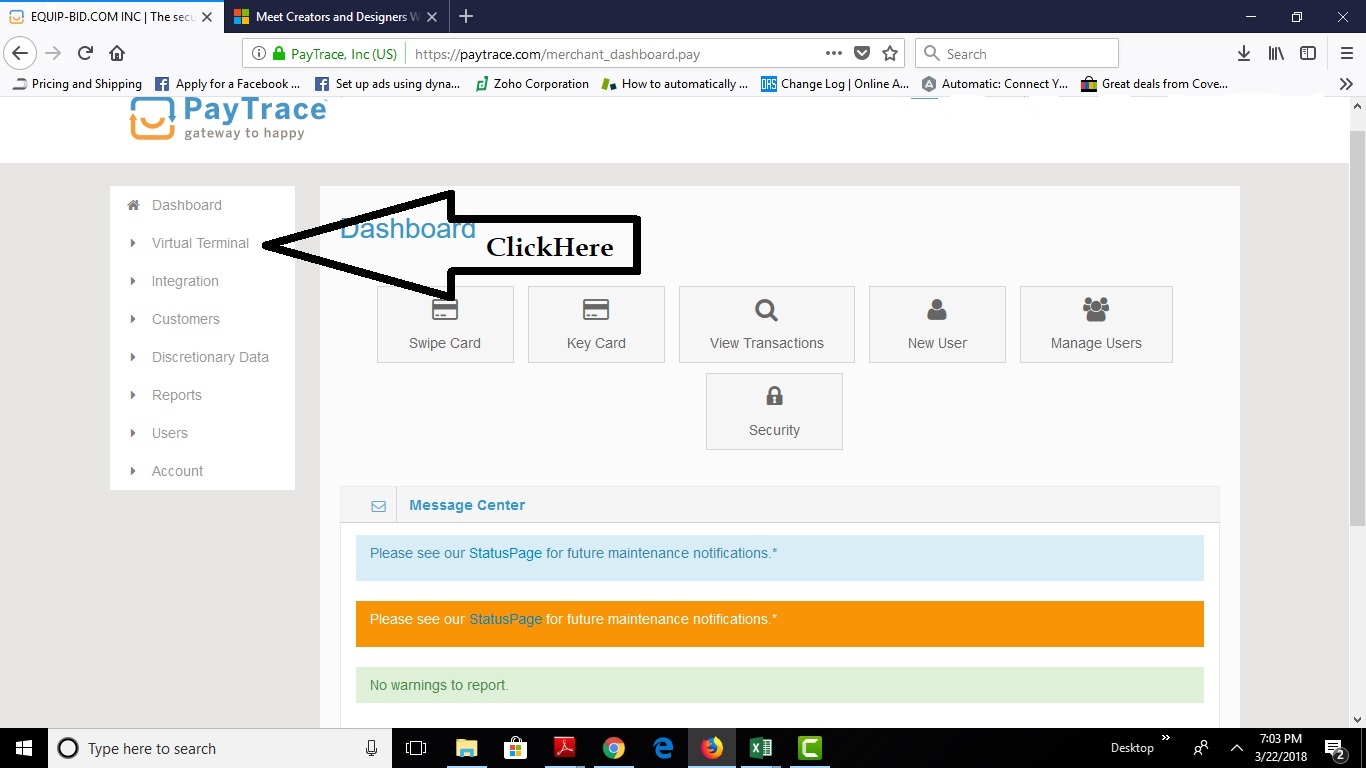
1. First, log into your Paytrace account.
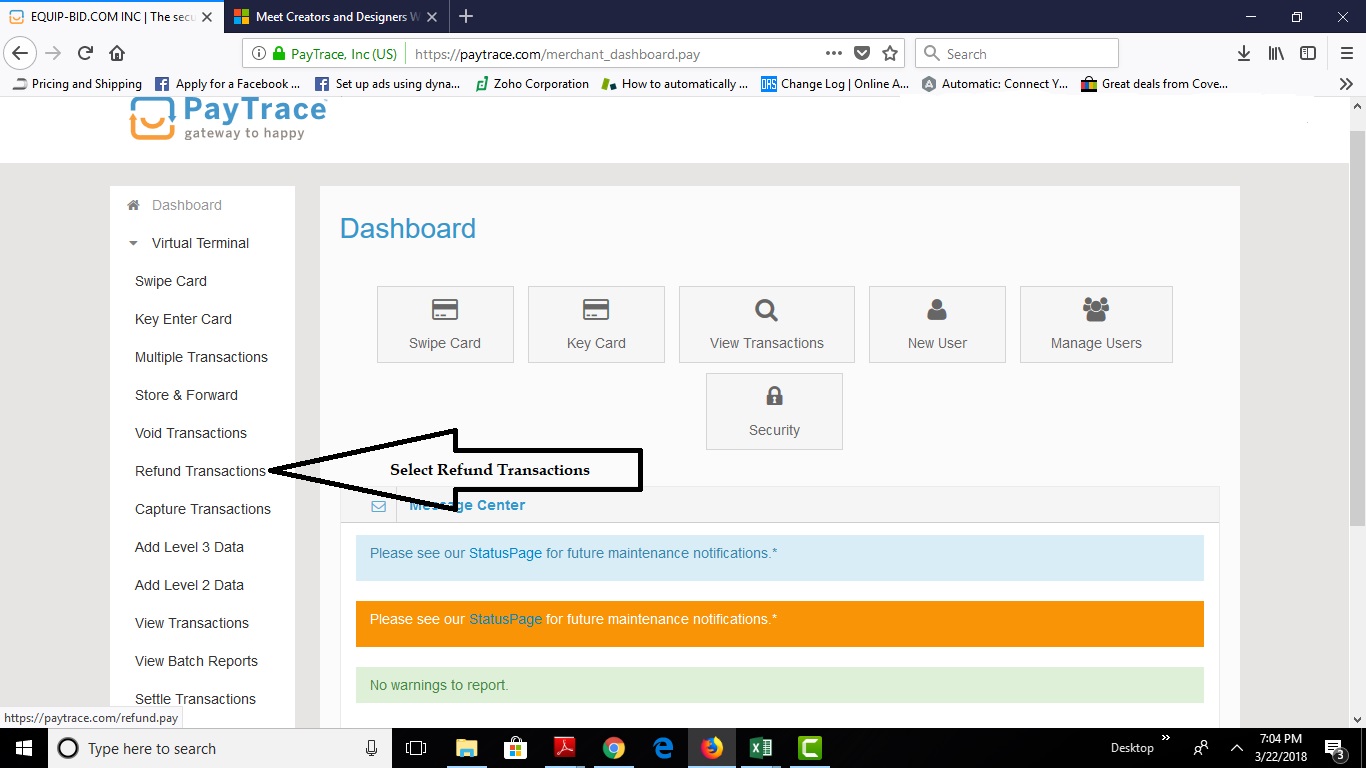
2. Select Refund Transactions
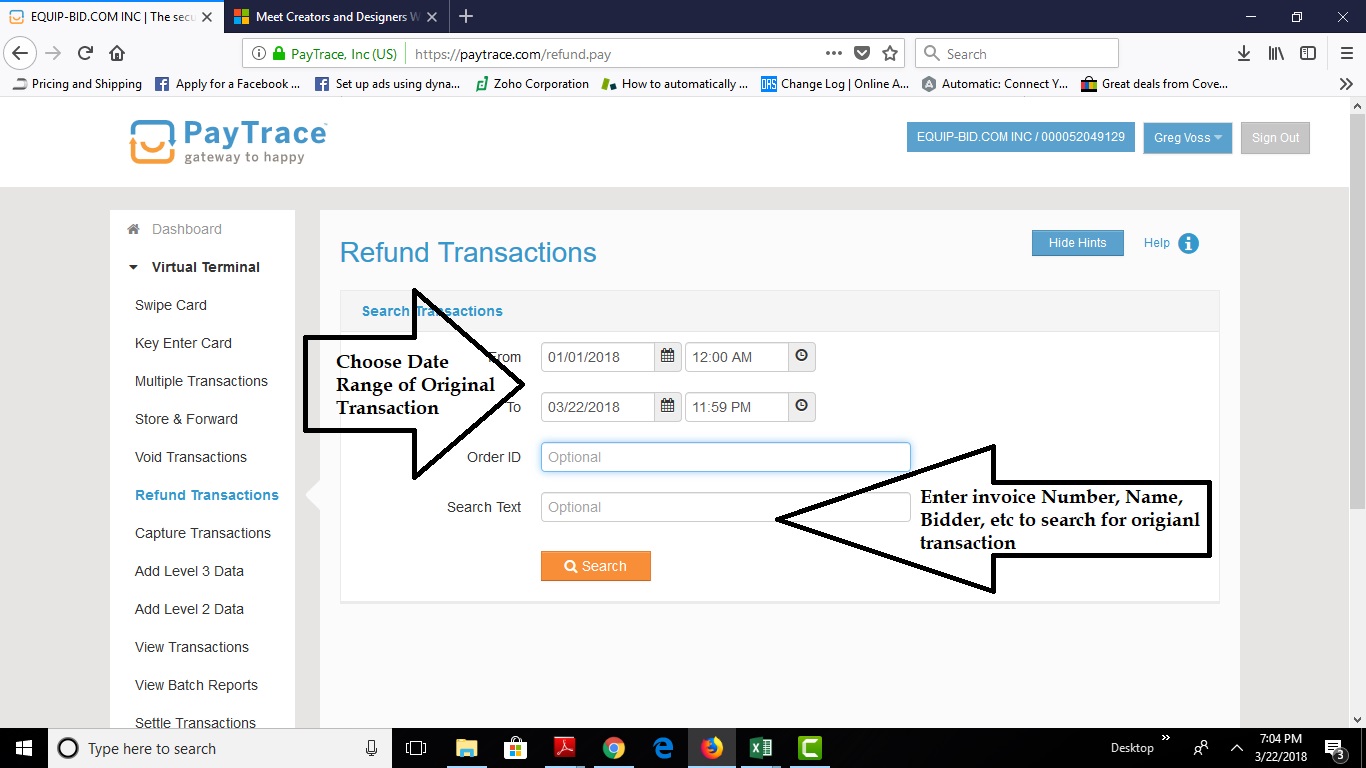
3. Choose Date Range of Original Transaction, then enter invoice number, name, bidder, etc to search for original transaction.
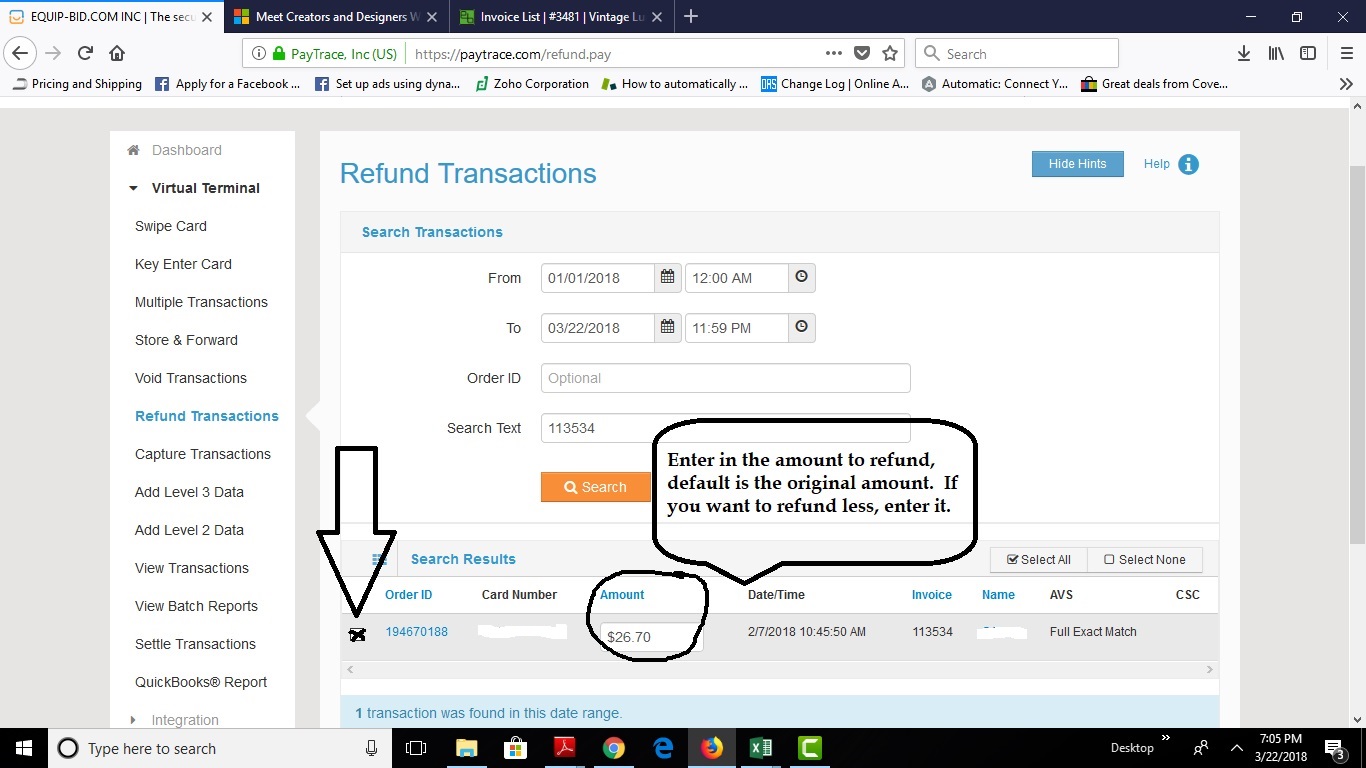
4. Enter in the amount to refund, default is the original amount. If you want to refund less, enter it.
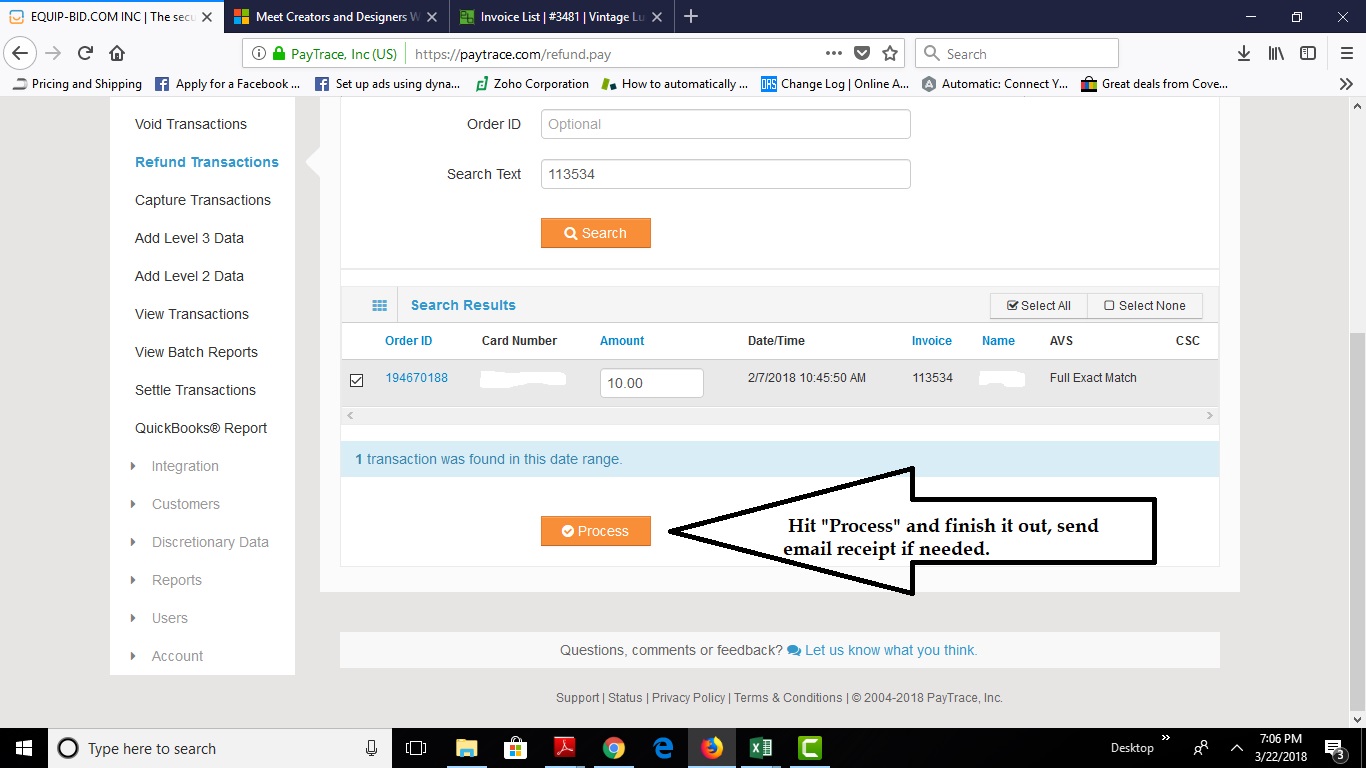
5. Hit "Process" and finish it out. Send email receipt if needed.
After you complete the refund, if you want a refund from us for the buyers premium, fill out our Refund Form. This allows us to adjust the invoices for the customer, and give you credit toward the buyers premium.

